A complete medical office cleaning checklist covers six things: regularly scheduled high-touch disinfection, between-patient turnover tasks, scheduled deeper cleaning, PPE and chemical safety protocols, an ad-hoc response plan for spills and contamination, and a documented sign-off trail an inspector can actually read. Miss any one of those six, and you don’t have a checklist. You have a chore list that happens to live in a clinic.
Here’s the version you can copy right now and hand to your team before you finish reading the rest of this article.
Daily (before open, between patients, and at close):
- Wipe down and disinfect exam tables, door handles, and light switches
- Disinfect all high-touch surfaces in waiting and reception areas
- Clean and restock restrooms
- Empty trash and replace liners in every room
- Sweep and mop or vacuum all floors
- Disinfect shared equipment (blood pressure cuffs, pulse oximeters, keyboards)
- Sanitize front-desk pens, clipboards, and check-in tablets
- Restock hand sanitizer and PPE stations
Weekly:
- Deep-clean waiting room upholstery and chairs
- Disinfect vents, blinds, and light fixtures
- Clean interior windows and glass partitions
- Wipe down breakroom appliances inside and out
- Scrub restroom grout and tile
- Check and refill spill kits and PPE supplies
Monthly:
- High-dust ceiling corners and vents
- Deep-clean carpets or hard floors with equipment
- Inspect and clean low-use equipment storage areas
- Audit cleaning logs and SDS binder for completeness
- Rotate or replace worn mop heads and cleaning tools
The highest-priority items, the ones that get flagged first in an audit and matter most for patient safety, are exam-room high-touch surfaces, restroom sanitation, and same-day cleanup of any visible contamination. Everything else on this list supports those three.
Key Takeaways
A complete medical office cleaning checklist works only when scheduled tasks, chemical safety protocols, and signed documentation operate as one connected system rather than three separate afterthoughts.
| Point | Details |
|---|---|
| Frequency drives structure | Split every task into regularly scheduled, on a weekly basis, and monthly buckets, with high-touch surfaces and exam tables cleaned between every patient. |
| Documentation is inspected as closely as surfaces | Logs need date, time, area, product with EPA reg. number, and staff initials to survive an audit. |
| Contamination response overrides the schedule | Clean immediately after visible soiling per CDC guidance, don PPE, and dispose of waste per OSHA’s bloodborne pathogen standard. |
| SDS access isn’t optional | OSHA’s 29 CFR 1910.1200 requires Safety Data Sheets on site for every chemical in active use. |
| Outsourcing the routine work frees up staff time | Neatandtidypros’s commercial cleaning service covers recurring high-touch disinfection and documentation support so managers can focus on patient care instead of chasing sign-off sheets. |
Table of Contents
- Building a Practical Medical Office Cleaning Checklist
- What “Clean” Actually Means in Every Room
- Stocking the Right Supplies Without Guessing
- What to Do the Moment Something Gets Contaminated
- Making Your Cleaning Program Audit-Proof
- Turning the Checklist Into a Real Schedule
- Your One-Page Printable Checklist and Sign-Off Sheet
- What I Wish More Managers Understood Before Year One
- How Neatandtidypros Handles Medical Office Cleaning
- Sources
Building a Practical Medical Office Cleaning Checklist
A generic office cleaning checklist and a clinical one aren’t the same document, and treating them as interchangeable is where most facilities go wrong. Medical vs. office cleaning differs in three ways: contact time requirements for disinfectants, bloodborne pathogen exposure risk, and the paper trail regulators expect to see afterward. A dental operatory cleaning checklist, for instance, needs product-specific dwell times noted next to each surface because instrument trays and countertops face different contamination risks than a waiting room chair.
Time estimates matter more than most managers assume when they’re staffing this out. A standardized checklist built around ISSA and OSHA guidance typically runs about a comprehensive set of critical items covering pre-service setup, high-touch disinfection, floors, restrooms, waste handling, chemical safety, and sign-off tasks to ensure thorough cleaning and compliance, and completing that full regularly scheduled list takes roughly an hour for a dental-office-scale practice. Scale that up or down depending on your square footage and exam room count.
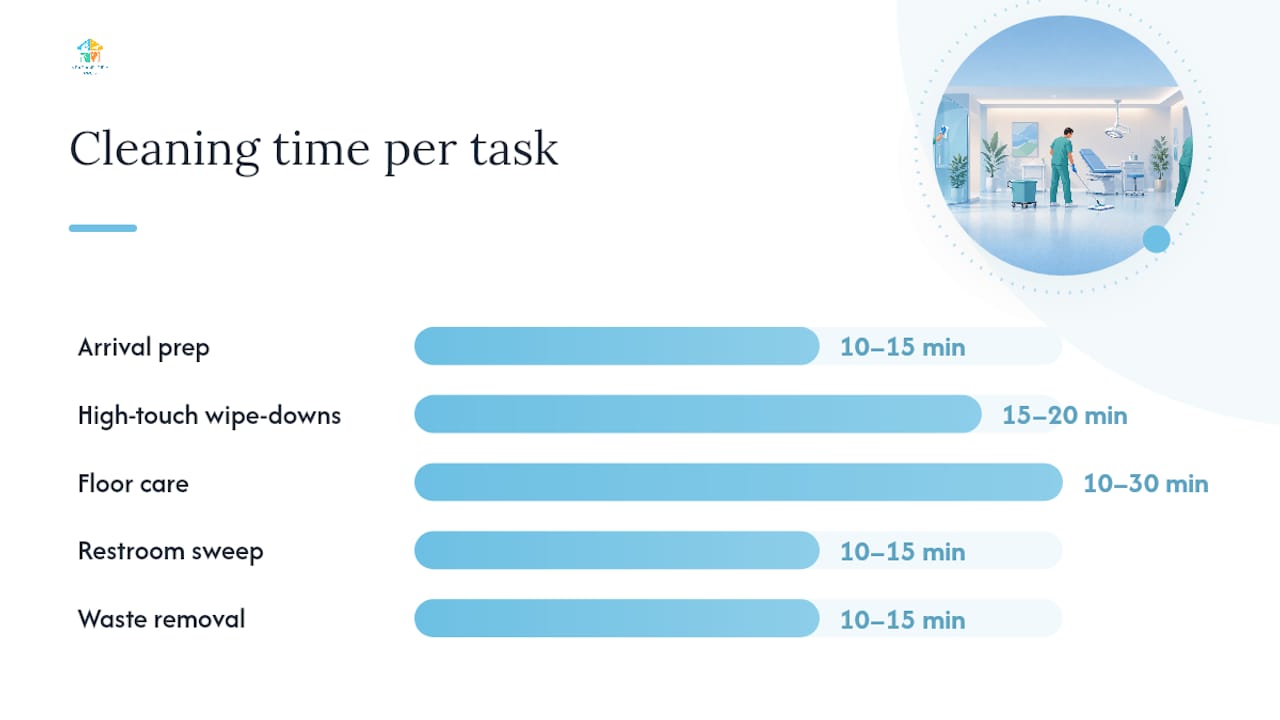
1. Arrival prep (10-15 minutes). Before the first patient walks in, staff should confirm supply carts are stocked, PPE stations are full, and any overnight condensation or dust has been wiped from counters. This is also when you check that yesterday’s cleaning log got signed.
2. High-touch wipe-downs (15-20 minutes). Door handles, light switches, elevator buttons, check-in kiosks, and shared pens get a disinfectant pass at open, midday, and close. This is the task most likely to get skipped when the schedule runs tight, and it’s the one CDC guidance flags as the most important routine to protect against surface transmission.
3. Floor care (10-30 minutes depending on square footage). Sweep or vacuum first, then mop with an EPA-registered disinfectant appropriate for the flooring. Small clinics with one or two exam rooms can knock this out in under 15 minutes; medium clinics with multiple exam rooms usually need more time.
4. Restroom sweep (10-15 minutes per restroom). Fixtures, mirrors, floors, and consumable restocking, done at least two times regularly scheduled in clinics with patient-facing restrooms.
5. Supply restock (several minutes). Hand sanitizer, tissues, exam table paper, glove boxes.
6. Waste removal (10-15 minutes). General waste and, separately, any regulated medical waste or sharps containers that have reached capacity.
Between-patient turnover is a different rhythm entirely, and it’s where a lot of checklists fall apart because they treat it as an afterthought to the regularly scheduled list instead of its own protocol.
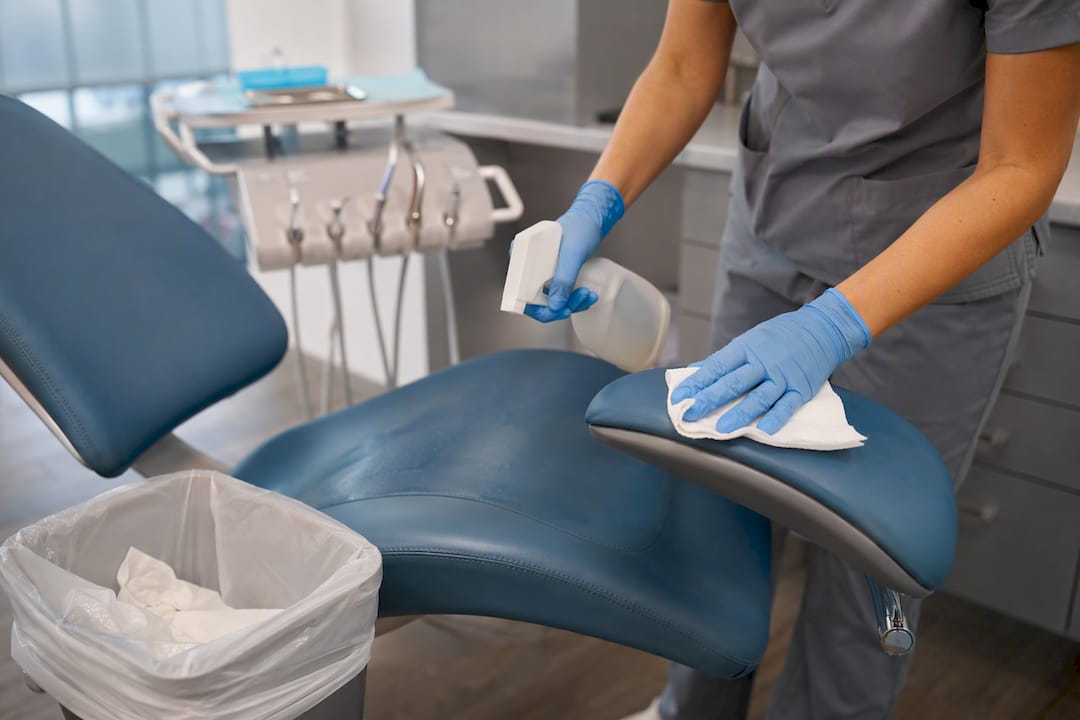
7. Disinfect the exam table and surrounding surfaces (2-3 minutes). This includes the table itself, any adjustable armrests, and the stool or chair the provider used.
8. Sanitize patient-contact equipment (1-2 minutes). Stethoscopes, otoscopes, blood pressure cuffs. If it touched skin, it gets wiped before the next patient.
9. Remove and replace barriers (1 minute). Disposable table paper, headrest covers, and any single-use protective barriers get swapped out, never reused.
10. Replace linens where applicable (1-2 minutes). Gowns, blankets, and pillowcases go straight into a designated hamper, not a general laundry pile.
Weekly and monthly tasks round out the schedule with items that don’t need regularly scheduled attention but can’t be skipped for months either: HVAC vents and blinds, upholstery extraction cleaning, light fixture dusting, and a check on any equipment that sits idle most of the week (backup exam tables, storage-room devices).
Time budgeting by clinic size:
| Clinic size | Daily checklist time | Weekly add-on time |
|---|---|---|
| Small (1-2 exam rooms) | about an hour | a significant amount of time |
| Medium (3-6 exam rooms) | an extended period of time | additional time |
| Larger multi-provider clinics | 2-3 hours split across shifts | a couple of hours, often outsourced |
Practices that co-develop these time estimates with their actual providers, rather than copying a generic template, tend to catch scope gaps early, which is a point that the American Dental Association’s coverage of environmental office cleaning makes repeatedly: cleaning is a visible signal of safety to patients, and the “who cleans what” conversation needs to happen before the schedule gets built, not after something gets missed.
What “Clean” Actually Means in Every Room
A clinic isn’t one environment. It’s five or six different risk zones stitched together, and a checklist that treats them all the same way is going to underclean the exam room and overclean the breakroom.
Exam rooms carry the highest stakes and the tightest specifications. Every surface that touches skin, fluid, or a device that touches skin needs disinfection with product-specific contact time, not just a quick wipe. If the label says the surface needs to stay visibly wet for 3 minutes to kill the pathogens it claims to address, a 10-second swipe with a dry-looking cloth accomplishes almost nothing. Disposable barriers on tables, trays, and headrests reduce the surface area that needs full disinfection between patients, which speeds up turnover without cutting corners. For electronics like exam room monitors or tablets, use only disinfectants the manufacturer approves, since aggressive chemicals can degrade screens and housings even while technically disinfecting them. A detailed surface disinfection process is worth building into training so staff understand contact time isn’t optional.
Reception and waiting areas get the most foot traffic and the least attention, usually because nothing there looks visibly dirty until it’s overdue. Upholstery needs periodic extraction cleaning, not just surface wiping, because fabric holds contaminants longer than hard surfaces do. If your practice has a children’s play area, set a clear policy on toys and books: either rotate them through a regularly scheduled disinfection cycle or remove soft, porous toys entirely and replace them with wipeable plastic ones. Shared pens, clipboards, and door keys at the front desk should get a disinfectant pass at least twice a day.
Restrooms need fixtures, mirrors, and floors cleaned regularly scheduled at minimum, with grout and tile getting a deeper scrub on a weekly basis since porous grout traps buildup that regularly scheduled wiping never fully removes. Consumables (soap, paper towels, toilet paper) should be checked at every regularly scheduled pass, not just when someone notices they’re empty. Patient-facing restrooms in higher-traffic clinics often need a midday touch beyond the standard morning and evening cleaning.
Breakrooms and staff areas carry food-safety concerns that exam rooms don’t. Refrigerators need a clear policy: labeled food only, expired items pulled on a weekly basis, and a full wipe-down of shelves monthly. Microwaves and coffee stations get cleaned regularly scheduled, since spilled food residue in a shared appliance becomes a pest and odor problem within days.
Back offices are easy to neglect because nobody’s touching them with bare skin the way they touch an exam table. Still, shared keyboards, phones, and office equipment need regular disinfection, and paper-heavy surfaces like desks and filing cabinets need dusting on a weekly basis cycle to avoid buildup that eventually affects air quality.
Pro Tip: Assign one staff member to do a two-minute “fresh eyes” walk-through of the waiting area every morning before the first patient arrives. Cleaning crews miss things they’ve stopped noticing; someone seeing the space for the first time that day catches them.
Stocking the Right Supplies Without Guessing
Buying whatever’s cheapest at a wholesale club is how clinics end up using the wrong product on the wrong surface, and it’s a more common problem than most managers realize. Every clinic needs a specific, non-negotiable supply list, and skipping items on it isn’t a budget shortcut, it’s a liability.
Your baseline stock should include:
- EPA-registered disinfectants rated for the pathogens relevant to a clinical setting
- Color-coded microfiber cloths (one color per zone, so a restroom cloth never touches an exam table)
- Disposable mop heads or a mop-and-bucket system with proper sanitizing between uses
- Approved disinfecting wipes for quick between-patient turnover
- Nitrile or vinyl gloves in multiple sizes
- Eye protection for staff handling concentrated chemicals
- Sharps containers placed and replaced per protocol
- Spill kits stocked and checked on a weekly basis
Reading a disinfectant label correctly is a skill, not a formality. Three things matter every time: contact time (how long the surface must stay visibly wet), surface compatibility (some products damage certain plastics or finishes), and manufacturer-specific instructions for dilution if the product isn’t ready-to-use. A disinfectant with a 10-minute contact time that gets wiped dry after 30 seconds hasn’t disinfected anything. It’s just made the surface smell like it did.
This is where OSHA’s Hazard Communication standard becomes relevant, not as bureaucratic overhead but as a genuine inspection risk. 29 CFR 1910.1200 requires that Safety Data Sheets be available on site for every chemical your staff uses, and inspectors checking compliance will ask for them by name. If your SDS binder is missing sheets for products currently in use, that’s a citation waiting to happen, independent of how clean your exam rooms actually look. Reviewing your OSHA housekeeping obligations as part of onboarding closes this gap before it becomes a problem.
Storage matters too. Chemicals need to be stored per label instructions, usually away from heat and out of reach in patient areas, labeled clearly if transferred to secondary containers, and rotated so nothing expires unnoticed on a back shelf. PPE has a replacement rhythm of its own: gloves get tossed and replaced constantly through the day, but eye protection and reusable items need a periodic inspection for cracks or degradation, roughly monthly in a moderate-use clinic.
What to Do the Moment Something Gets Contaminated
The rule is simple and it overrides the regular schedule entirely: clean immediately after any visible soiling or suspected contamination, not at the next scheduled pass. CDC guidance is explicit that ad-hoc cleaning has to happen in addition to routine cleaning, not as a substitute scheduled for later in the day.
Here’s the sequence that holds up under scrutiny:
- Isolate the area immediately. Block off the space so no patient or staff member walks through it before cleanup starts.
- Don appropriate PPE. Gloves at minimum; add eye protection and a gown if there’s any risk of splash, per OSHA’s bloodborne pathogen standard, 29 CFR 1910.1030.
- Absorb and remove bulk material first. Use absorbent material for liquids before applying disinfectant. Disinfecting on top of standing fluid dilutes the product and wastes contact time.
- Apply an EPA-registered disinfectant and respect the full dwell time. This is the step people rush, and it’s the step that determines whether the cleanup actually worked.
- Handle sharps according to protocol. Never pick up a sharp object by hand; use forceps or a dedicated tool and drop it directly into a sharps container.
- Dispose of waste in the correct container. Regulated medical waste never goes into general trash.
Not every incident needs to go up the chain, but some do. Notify clinical leadership or occupational health when the contamination involves a bloodborne pathogen exposure risk to staff, when the area can’t be fully decontaminated with routine supplies, or when a patient or staff member reports direct contact with the contaminant. In those cases, close the area until cleanup and any required reporting is complete rather than reopening it on a visual “looks fine” judgment call.
Inspectors don’t just check whether the space is clean. They check whether you can prove, on paper, exactly when it got clean, who did it, and what they used. A spotless room with no incident record behind it can still draw a citation.
Recordkeeping for every incident should capture the time it happened, the staff member who responded, the product used, and the final disposition (area reopened, waste disposed, leadership notified). This isn’t paperwork for its own sake. It’s the difference between a clinic that can defend its practices during an audit and one that’s simply hoping nobody asks.
Making Your Cleaning Program Audit-Proof
Here’s a fact that surprises a lot of first-time facility managers: inspectors care more about your logs than your baseboards. A spotless clinic with no documentation behind it can still fail a review, because compliance in a medical setting isn’t just about the state of the room, it’s about proving a consistent process. Managers who skip the paper trail often discover this the hard way, usually during their first real audit.
A usable cleaning log needs specific fields, not a vague “cleaned yes/no” checkbox:
- Date and time of the cleaning pass
- Area or room cleaned
- Specific tasks completed (not just “cleaned exam room 2,” but which surfaces)
- Product used, referenced by name and EPA registration number or SDS reference
- Staff initials confirming the work
An example entry might read: “3/12/2026, 8:15 AM, Exam Room 3, high-touch surfaces and table disinfected, [Product Name] EPA Reg. 12345-6, initials JR.” That single line answers every question an inspector is likely to ask.
Quality assurance works best as a layered system rather than a single annual check. Weekly spot checks by a supervisor catch small lapses before they become patterns. Monthly audits comparing logs against actual completed work reveal whether staff are documenting accurately or just filling boxes. A corrective-action log, tracking what went wrong and what changed as a result, shows an inspector that your process improves over time instead of just existing on paper.
| QA layer | Frequency | Who’s responsible |
|---|---|---|
| Spot checks | Weekly | Shift supervisor |
| Full audit | Monthly | Facility manager |
| Corrective-action review | After every flagged issue | Facility manager |
| SDS binder review | Monthly | Designated safety lead |
Training ties all of this together. New staff need an onboarding checklist that covers contact times, PPE use, and log completion before their first solo shift, not weeks after. Refresher training on a quarterly or semiannual cadence keeps the team sharp on protocol changes, and a documented SDS review during onboarding, paired with periodic competency checks, gives you a defensible record that training actually happened rather than just being assumed.
Turning the Checklist Into a Real Schedule
A checklist is only as good as the schedule and staffing plan built around it, and this is where most well-intentioned programs quietly fall apart. Someone writes a great checklist, nobody assigns clear ownership, and within a month half the items are getting skipped because everyone assumed someone else had it.
1. Decide what stays in-house. Daily high-touch disinfection, between-patient turnover, and restroom checks are best handled by staff who are on-site anyway and can respond in real time. These tasks need to happen fast and often, which favors your own team over a scheduled outside visit.
2. Decide what gets outsourced. Deep carpet extraction, window washing, and HVAC vent cleaning are periodic, equipment-heavy jobs that most clinics don’t staff for internally. Bringing in a contractor for these on a monthly or quarterly basis is usually more cost-effective than buying and maintaining the equipment yourself.
3. Build a sample on a weekly basis staffing plan. A small clinic might need one dedicated cleaning staffer for 90 minutes regularly scheduled plus a three-hour on a weekly basis deep session. A medium clinic often runs two staggered shifts to cover both morning prep and evening close, with a contracted crew handling the on a weekly basis deep clean.
4. Set contract terms before you sign anything. When negotiating with a cleaning provider, nail down coverage hours, proof of insurance, how documentation gets delivered (digital logs, photos, or physical sign-off sheets), and response time commitments for incident cleanup. Treating the contract as a partnership with explicit task ownership and named products prevents the finger-pointing that happens when “someone” was supposed to handle something.
5. Compare bids on an hourly basis, not just the total quote. A fixed monthly quote can hide wildly different staffing levels. Convert every quote to an hourly equivalent based on stated coverage hours, and check the provider’s insurance and worker classification before signing, since liability gaps here become your problem, not theirs, if something goes wrong.
Pro Tip: Ask any prospective cleaning contractor to walk your space and quote against your actual checklist, not their generic template. If they can’t tell you which tasks their standard service covers versus what costs extra, that’s a scope gap you’ll discover later as a billing dispute.
For clinics weighing whether a broader cleaning schedule overhaul makes sense, the same scheduling logic that works for general offices applies here, just with tighter frequency and stricter documentation layered on top.
Your One-Page Printable Checklist and Sign-Off Sheet
A printable template beats a shared spreadsheet for one simple reason: staff can check a box in real time without opening a laptop, and a physical sign-off sheet is harder to backdate than a digital entry nobody watched get filled in.
Build your one-page template with these sections:
- Header fields: clinic name, room or area, date, and shift (morning/midday/close)
- Frequency sections: clearly divided blocks for regularly scheduled, on a weekly basis, and monthly tasks so staff aren’t hunting for what applies to their shift
- Task rows: each with a checkbox, a short task description, a column for product used, and a column for staff initials
- Notes field: open space at the bottom for anything unusual, like a spill that needed extra cleanup or a supply that ran out
Customize rows for whatever your practice actually has: a dental operatory checklist needs rows for handpieces and suction lines that a general medical office checklist doesn’t, while a facility with an on-site lab needs a row for specimen-area disinfection that a standard exam room checklist skips entirely. The template only works if it reflects your actual equipment, not a generic clinic.
For going digital without losing your audit trail, a few options work well: scan completed paper sheets into a dated folder system, have staff photograph the signed sheet at the end of each shift and log it to a shared drive, or use a simple form system where staff check boxes on a tablet and the timestamp gets recorded automatically. Whichever method you choose, the goal is the same one that matters in every audit: a reviewer should be able to pull any date and see exactly what got cleaned, by whom, with what product.
What I Wish More Managers Understood Before Year One
Most cleaning failures I’ve seen in medical offices aren’t about effort. They’re about scope that nobody wrote down. A crew shows up, does what they think is included, and three months later the manager discovers vents haven’t been touched since the contract started because nobody specified who owned that task.
Do this: Put every task in writing before the first cleaning day, including who’s responsible for the ones you assume are “obvious.” Don’t do this: Assume a verbal walkthrough covers you, because verbal agreements are the first thing that gets forgotten when staff turn over. Do this: Train new hires on the checklist itself, not just on general cleaning technique, since a checklist only protects you if the person using it actually reads it. Don’t do this: Let documentation slide because the room looks clean. Looking clean and being documented are two different problems, and only one of them survives an audit.
The clinics that struggle least are the ones that treat the checklist as a living contract between everyone who touches the space, revisited every few months, not a document written once and filed away.
— Neat
How Neatandtidypros Handles Medical Office Cleaning
If building and enforcing all of this in-house sounds like a second job on top of running a clinic, that’s the exact gap Neatandtidypros exists to close. Instead of hiring, training, and managing a cleaning team yourself, you get an insured crew that already understands SDS handling, contact-time discipline, and the kind of documentation an inspector actually wants to see.
Neatandtidypros’s commercial cleaning service covers the recurring regularly scheduled and on a weekly basis work this checklist outlines, from high-touch disinfection to restroom and breakroom maintenance, backed by auditable logs your practice can hand over during a review without scrambling. For deeper seasonal work like upholstery extraction or high-dusting that most clinics don’t staff for internally, our deep cleaning service picks up exactly where the regularly scheduled routine leaves off. Trained staff, documented product use, and insured crews mean you’re not the one filling gaps in the SDS binder at 5 PM before a surprise inspection. If you want to see how this fits your specific layout and room count, request an assessment through our services page and we’ll walk your space against a checklist built for it, not a generic template.
Sources
Keep these on hand when you’re writing or revising your own protocols, not just when you’re preparing for an inspection.
- Occupational Safety and Health Administration (OSHA)
- Centers for Disease Control and Prevention (CDC)
- American Dental Association News — Environmental office cleaning
- POPProbe — Dental Office Cleaning Checklist
- PMC article on environmental cleaning (peer-reviewed source)